scroll, resize tab의 active 상태 구현에 필요한 지식
기능 설명
- 공통 기능
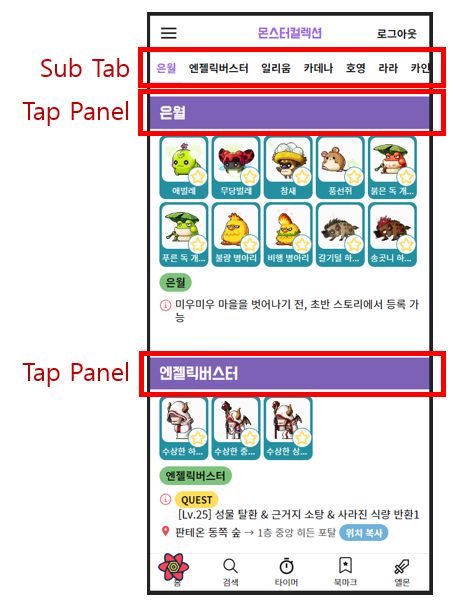
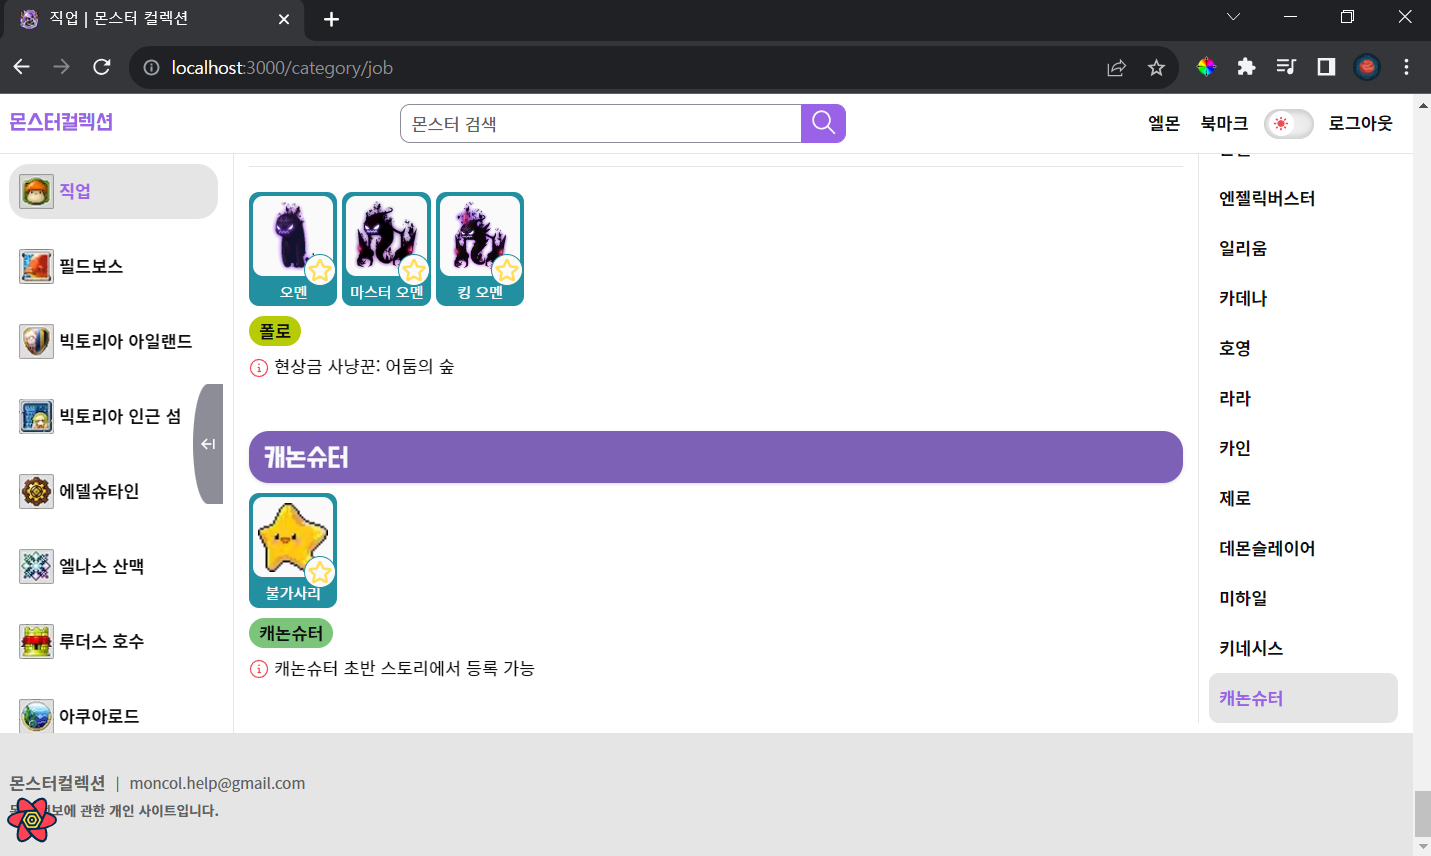
- Sub Tab Item을 클릭하면, 해당 하는 Tap Panel 위치로 이동한다.
- scroll 이벤트 시, 각 Tap Panel 위치에 도달하면 해당 하는 Sub Tab Item이 active 상태가 된다.
- resize 이벤트 시, Tap Panel의 위치를 재설정한다.
- 모바일 기능
- active 상태인 Sub Tab Item으로 자동 가로 스크롤
 |
 |
▶ scroll에 따른 active 상태 변경
사용자의 scroll에 따라 Sub Tab의 active 상태가 변경될려면 다음 식이 성립하면 됩니다.
현재 스크롤된 값 > Tap Panel 절대 위치
현재 스크롤된 값을 구하는 방법은 window.scrollY 를 이용하고,
각 Tap Panel의 절대 위치를 구하는 방법은 window.scrollY + element.getBoundingClientRect().top 을 이용합니다.


스크롤을 더 이상 할 수 없으면서, 마지막 Tap Panel의 절대 위치를 넘지 못하는 경우가 발생할 수 있습니다.
사용자가 스크롤을 끝까지 했으면 마지막 Tab Item을 새로운 active tab으로 설정하는 로직을 추가합니다.
// 10단위 올림
if (
  Math.ceil((window.scrollY + window.innerHeight) / 10) * 10 >= document.body.offsetHeight
) {
  newActiveTab = 11;
}
- 영상
▶ Tab Item 클릭 시, 해당하는 Tap Panel로 scroll
Tap Panel의 상대 위치를 getBoundingClientRect().top을 이용하여 구합니다.
현재 위치를 기준으로 스크롤하는 window.ScrollBy()에 Tap Panel의 상대 위치 값을 넘겨주면 해당하는 Tap Panel로 스크롤합니다.
export default function TabPanel({ title }: Props) {
  const headRef = useRef<HTMLHeadingElement>(null);
  const { tabLable, scrollToTabPanel, savePanelPosition } = useScrollTabPanel();

  useEffect(() => {
    if (tabLable === title) {
      const position = headRef.current?.getBoundingClientRect().top;
      scrollToTabPanel(position ?? 0);
    }
  }, [tabLable, title, scrollToTabPanel]);

  ...
  ...

  return (
    <h2 className={`${styles.title} ${dohyeon.className}`} ref={headRef}>
      <span>{title}</span>
    </h2>
  );
}
export default function useScrollTabPanel() {
  const scrollToTabPanel = (position: number) => {
    window.scrollBy({
      top: calcScrollAmount(position),
    });
  };

  ...

  return {
    tabLable,
    panelPosition,
    getTabLabelOnClick,
    scrollToTabPanel,
    savePanelPosition,
  };
}
- 영상
▶ document resize 이벤트 발생 시, Tap Panel 위치 재설정
document resize 이벤트가 발생하면, Tap Panel의 절대 위치가 변경됩니다. 이 경우 이전 document size 기준으로 Sub Tab의 active 상태가 변경되기 때문에 Tap Panel의 위치를 새롭게 설정해야 합니다.
scroll, resize 이벤트는 변경이 일어날때마다 많은 이벤트가 발생합니다. 무거운 작업이 있다면 렉이 걸릴 수 있는데, 이 때 thorttle을 적용해 성능 최적화를 할 수 있습니다.
이 프로젝트에서는 lodash 라이브러리를 사용했습니다.
throttle: 마지막 함수가 호출된 후 일정 시간이 지나기 전에 다시 호출되지 않도록 하는 것
export default function TabPanel({ title }: Props) {
  const headRef = useRef<HTMLHeadingElement>(null);
  const { tabLable, scrollToTabPanel, savePanelPosition } = useScrollTabPanel();

  const throttleHandler = useMemo(
    () =>
      throttle(() => {
        if (headRef.current) {
          const position =
            window.scrollY + headRef.current.getBoundingClientRect().top;
          savePanelPosition(title, position);
        }
      }, 700),
    [title, savePanelPosition]
  );

  const detectTabPanelPositon = useCallback(throttleHandler, [throttleHandler]);

  useEffect(() => {
    detectTabPanelPositon();
  }, [detectTabPanelPositon]);

  useEffect(() => {
    window.addEventListener('resize', detectTabPanelPositon);
    return () => {
      window.removeEventListener('resize', detectTabPanelPositon);
    };
  }, [detectTabPanelPositon]);

  ...

  return (
    <h2 className={`${styles.title} ${dohyeon.className}`} ref={headRef}>
      <span>{title}</span>
    </h2>
  );
}
- 영상
▶ 모바일 Sub Tab 자동 가로 스크롤 구현
각 Sub Tab Item의 절대 위치를 저장하고, resize 이벤트를 고려합니다.
scrollLeft는 SubTab의 가로 스크롤 위치인 element.scrollLeft 값 입니다.
type Props = {
  index: number;
  active: number;
  title: string;
  scrollLeft: number | undefined;
  onClick: (e: React.MouseEvent, index: number) => void;
  saveTabPosition: (index: number, position: number) => void;
};

export default function TabItem({
  index,
  active,
  title,
  scrollLeft,
  onClick,
  saveTabPosition,
}: Props) {
  const itemRef = useRef<HTMLLIElement>(null);
  const throttleHandler = useMemo(
    () =>
      throttle(() => {
        if (
          window.matchMedia('(max-width: 48rem)').matches &&
          itemRef.current &&
          scrollLeft !== undefined
        ) {
          saveTabPosition(
            index,
            itemRef.current.getBoundingClientRect().left + scrollLeft
          );
        }
      }, 700),
    [index, saveTabPosition, scrollLeft]
  );

  const detectTabPosition = useCallback(throttleHandler, [throttleHandler]);

  useEffect(() => {
    detectTabPosition();
  }, [detectTabPosition]);

  useEffect(() => {
    window.addEventListener('resize', detectTabPosition);
    return () => {
      window.removeEventListener('resize', detectTabPosition);
    };
  }, [detectTabPosition]);

  return (
    <li
      className={`${styles.item} ${index === active && styles['is-active']}`}
      ref={itemRef}
      role='tab'
      aria-labelledby={title}
      onClick={(e: React.MouseEvent) => onClick(e, index)}
    >
      {title}
    </li>
  );
}
지정된 위치로 스크롤하는 window.scrollTo()와 Tab Item의 절대 위치를 이용하여, 왼쪽에서 50만큼 떨어진 위치로 자동 이동되도록 구현했습니다.
type TabPosition = {
  [key: number]: number;
};

export default function useActiveTabScroll() {
  const [tabPosition, setTabPosition] = useState<TabPosition>({});
  const tabRef = useRef<HTMLElement>(null);
  const { getTabLabelOnClick } = useScrollTabPanel();
  const { active, handleActiveTab } = useActiveTab();

  useEffect(() => {
    if (window.matchMedia('(max-width: 48rem)').matches) {
      tabRef.current?.scrollTo({
        left: tabPosition[active] - 50,
        behavior: 'smooth',
      });
    }
  }, [tabPosition, active]);

 ...
 ...

  return { tabRef, active, handleScrollTabClick, saveTabPosition };
}
- 영상
▶ 코드

해당 코드는 아래 링크에서 확인할 수 있습니다.